


Identify Pro
Purpose
Identify Pro tool is provided for advanced identifying features in ArcMap.
Description
In addition to standard Identify functionality in ArcMap XTools Pro Identify Pro tool allows:
-
Editing attributes
-
Undo edits for each attribute cell separately
-
Viewing attribute field types
-
Filtering fields by type and name
-
Adding, deleting Raster and BLOB field content
-
Viewing geometry properties of the identified features
-
Copying geometry properties to clipboard
-
Deleting identified features
-
Identifying selected layers
-
Identifying selected features only
-
Adding, deleting, renaming attachments
-
Identifying and editing relates
Note that most of the advanced functionality is supported only for feature classes. For Raster or TIN datasets, for example, standard Identify functionality is used in the same dialog.
Using Identify Pro
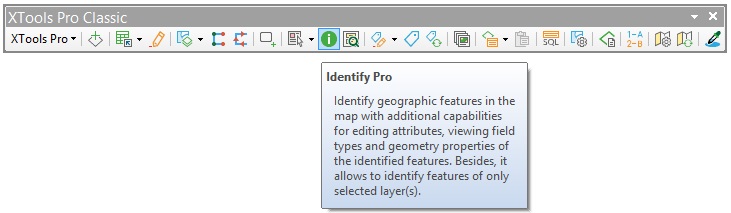
To start identifying features using the XTools Pro Identify Pro tool select the tool from the XTools Pro toolbar:
Selecting the Identify Pro tool immediately opens the Identify Pro Results window so that you can select a layer to identify and position the window conveniently on your screen before you click on a feature in the map.
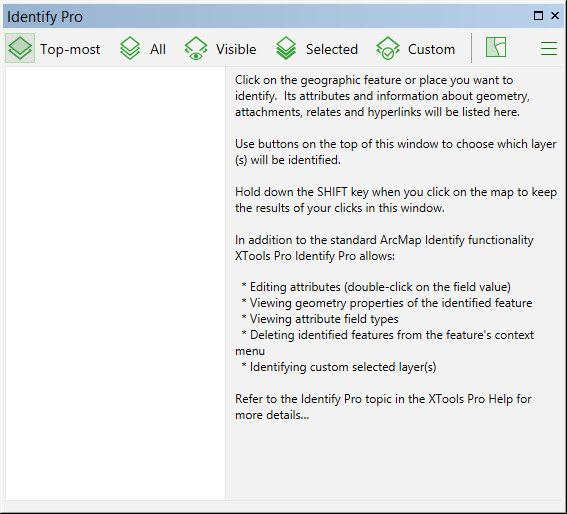
For identifying features following options are available:
-
Top-most - this is the default option, allows identifying features from the top-most layer on the map.
-
All - identifies features from all map layers.
-
Visible - with this option you can identify features only from the layers set as visible in the Table of contents.
-
Selected - with this option you can identify features only from the layers selected in the Table of contents.
-
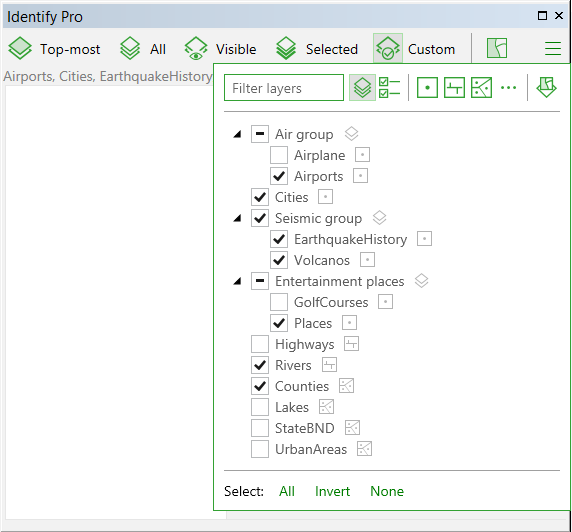
Custom - here you can filter and select those layers you are going to identify. Selected layers are shown in the string under the filter bar.
The separate option Selected features allows identifying only selected features. If you are accustomed to the other standard usage scenarios, just select it in the top filter bar and this selection will be remembered for you within the current ArcMap session.
Identifying features
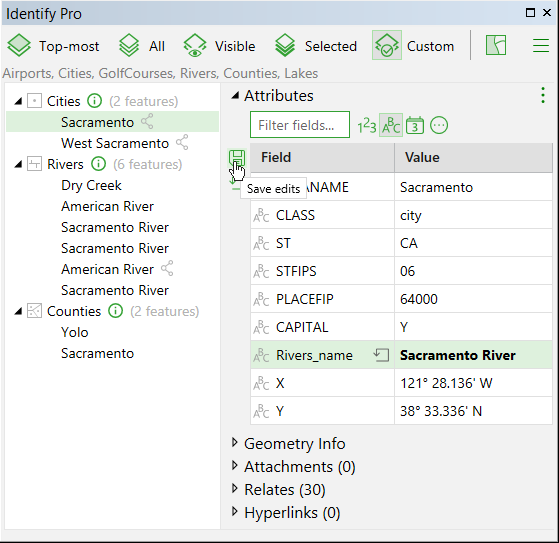
Clicking the Identify Pro tool on a location inside a data frame will present the data attributes, geometry properties and attachments, relates, hyperlinks if features identified at that location have them. In the Feature list you can see it as icons near the identified features. Number of identified features for each layer is shown next to the layer name.
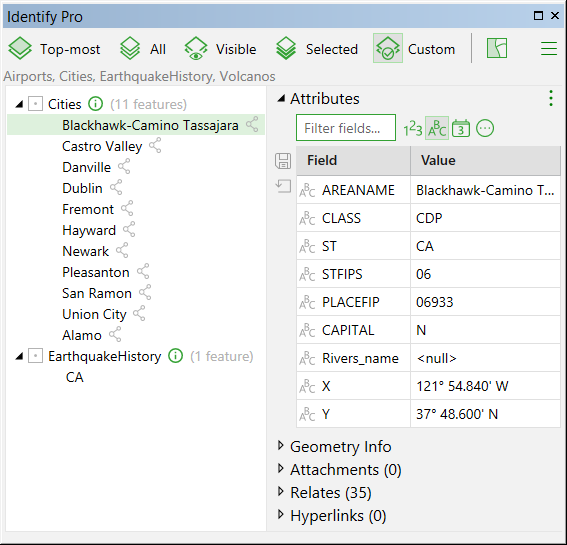
All sections (Attributes, Geometry Info, Attachments, Relates and Hyperlinks) are shown by default, but they can be collapsed or hidden (if empty).
Editing attributes
To edit attribute data double-click on the attribute value. You can modify, delete or simply copy-paste attribute values. For easier browsing in case of many fields you can filter fields by type or by text contained in field names.
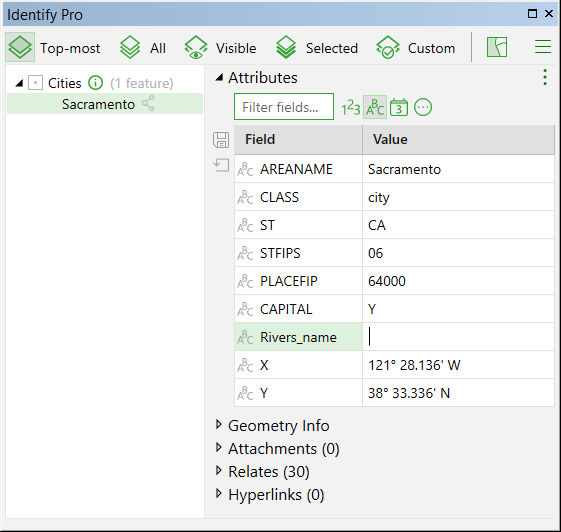
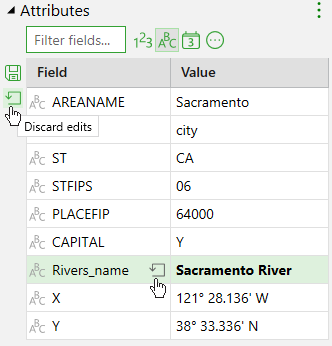
If the attribute value has been edited, it is shown in bold so that you can always see what attributes were modified. At the same time, "Save Edits" and "Discard Edits" buttons become active. You can save your edits:
... or discard them. You can discard either all edits (with the Discard button on the left of the attribute table) or do it for each edited cell separately (using the Discard button in the cell):
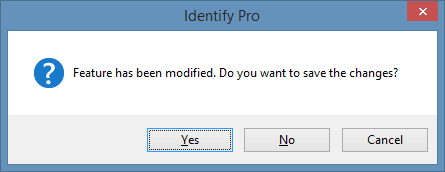
In case you did not save or discard your edits but clicked on another feature you will be anyway asked if you wish to save the changes:
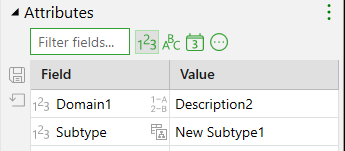
Domains, subtypes, subtype domains
Attribute domains, subtypes and subtype domains are supported in Identify Pro. Therefore, the tool will not allow to save any new values beyond the domain or subtype in the field with the attribute domain defined. Domains and subtypes applied to the field are marked icons:
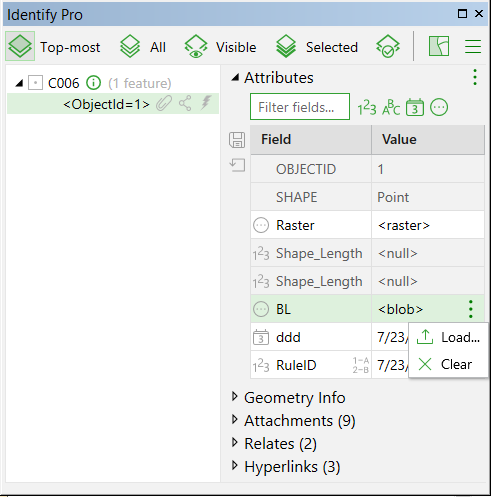
Raster and BLOB fields
New version of Identify Pro tool allows editing Raster and BLOB field content. All commands are available from field context menu or by right-click.
In addition to Load and Clear options you can view Raster field content or its properties in separate window and also you may save content as file on the disk.
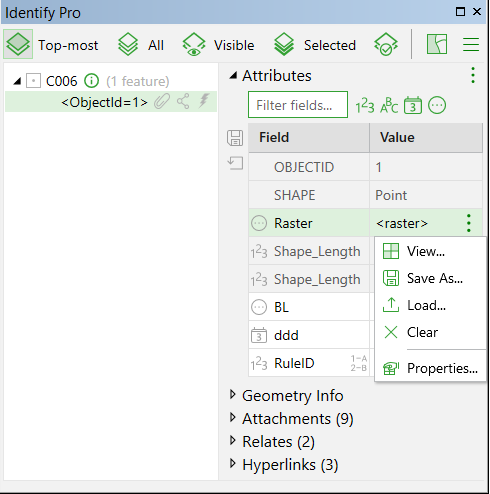
As for BLOB field you can load or clear content only. Editing BLOB field content is possible if you turn this field on before identifying.
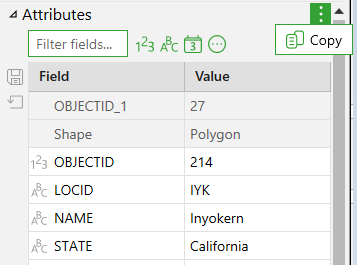
Copying attribute records to clipboard
You can copy attribute records to clipboard to use them in another application. The command is available from context menu of Attributes section.
Deleting features
In the Identify Pro tool identified features can be deleted (from the feature class). To delete feature right-click on the feature you wish to delete in the Feature list and select "Delete feature":
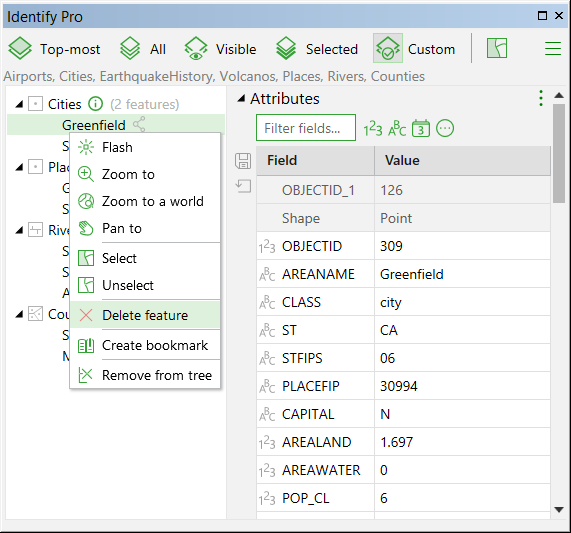
Before the feature will be deleted, a confirmation will be asked if you really want to delete the selected feature:

Note:
This deletion cannot be undone!
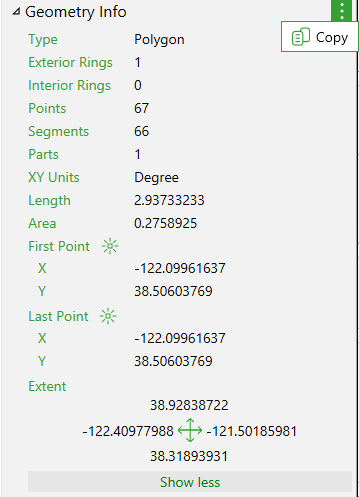
Section Geometry Info
This section contains all information about feature geometry properties. With new version of Identify Pro tool you can see this information and copy it to clipboard (by Copy command from the section context menu). For polyline and polygon features new buttons "Flash the first point" and "Flash the last point" are available to find out its placement or closure. You may also manage the section content display by "Show more/less" buttons.
Section Attachments
New version of Identify Pro tool allows you to add, rename and delete attachments. Also you can open attachment in the application associated and save attachment item as file on the disk. All commands are available from item's context menu or by right-click.
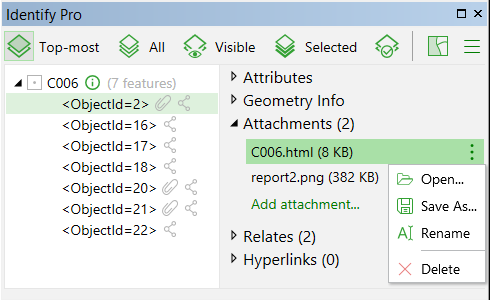
If the feature identified hasn't had attachments yet, section Attachments has one button "Add attachment" only.
Note:
-
This section is available for geodatabase feature classes only.
-
You don't have to enable attachments for your feature class before adding, they will be enabled automatically.
-
If you have Basic license for ArcMap, adding, renaming and deleting attachments aren't available.
-
It is recommended not to add the big-sized files as attachments. They may not be added.
Section Relates and Relates Info separate window
If identified feature has relates, you can see the list of relates in this section. Relates' list contains the same information as Feature list: geometry type, feature count for each layer related, icons of attachments, relates and hyperlinks for each feature related if it has them.

To operate with relates of the identified feature the separate window can be opened by "Show relates info" button. Functionality of Relates info window is the same as the main tool window without the top filter bar and location info. You can edit attributes, view and copy geometry info, manage attachments, relates and hyperlinks and others for features related.

Note:
With "many-to-many" or "many-to-one"
relates, the features of identifying layer aren't taken into account in
Relates' list of Relate info separate window.
Section Hyperlinks
This section is the same as ArcGIS Hyperlink manager. You can manage hyperlinks in the Identify Pro tool window. Opening in application associated and deleting URLs or some documents are available from item's context menu or by right-click. Button "Add hyperlink" opens Add Hyperlink dialog window, where you can choose hyperlink type.
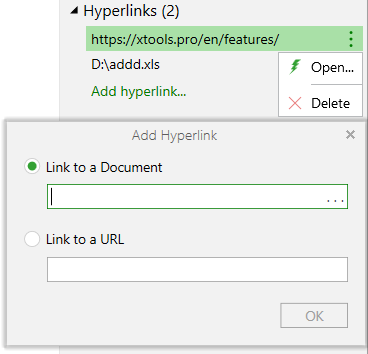
If the feature identified hasn't had hyperlinks yet, section Hyperlinks has one button "Add hyperlink" only.
Note:
To save a hyperlink added to a feature
you have to save the ArcMap document. Otherwise, with opening the ArcMap
document next time, the feature won't have the hyperlink added.
Location info
Identify Pro click location coordinates are available in the Location bar on bottom of the Identify Pro results window. By default location coordinates units are the same as map units, but you can change other units from the list if required.
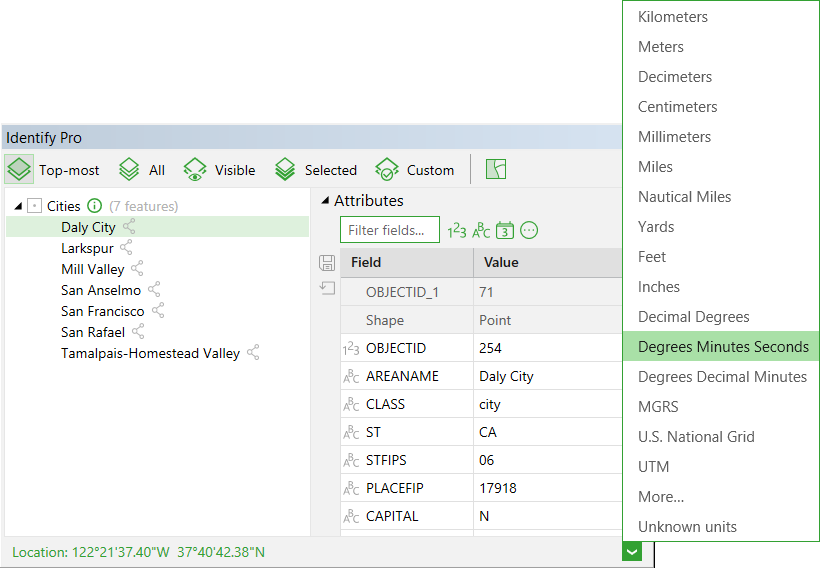
Location info bar can be hidden in the Identify Pro options if not required.
Working with identified layers and features
Identified layers and features context menu provides the following capabilities.
-
Flashing features
Identified features can be flashed on the map so that you can see where the identified feature is among other features on the map.
-
Navigation
It is possible to zoom and pan to the identified features and layers as well as zoom to a full extent.
-
Selecting features
Reflecting the improvements in the Identify tool introduced in ArcGIS selecting/unselecting features is organized the same way in the Identify Pro tool. To select feature right-click on the identified feature in the list of identified features and click "Select":
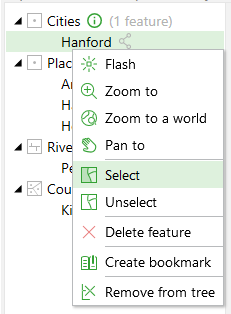
Selected features are added to selection and become highlighted with bold. To unselect feature right-click on the selected feature in the list of identified features and click "Unselect".
-
Bookmarks
Like in standard ArcMap Identify tool you can set bookmarks and add (manage) bookmarks for identified features.
-
Remove features from the Feature list
You can also remove some features identified from Feature list tree by the "Remove from tree" command of the feature context menu. The same way you can remove some layers identified from Feature list by the command from the layer context menu.
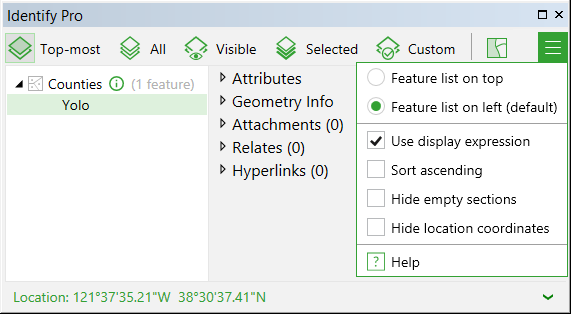
Options
Identify Pro options are available from the menu in the upper right corner of the Identify Pro results window.
-
Feature list on left and on top
By default Feature list is shown on the left side. But if you dock the Identify results window to the left or right side in ArcMap you may wish to select option "Feature list on top" in the menu to narrow the Identify results window.
-
Use display expression
This option allows you to show the result of display expression as feature name in Feature list. If the specified display expression field of the identified feature is empty then the Object ID (FID) of this feature is displayed. This way, if a few features with empty display expression field are identified, they anyway can be easily distinguished by FIDs:

-
Sorting identified features
This option allows sorting identified layers and features ascending in Feature list.
-
Hiding empty sections
This option allows hiding unnecessary empty sections like Attachments, Relates or Hyperlinks as you don't always have attachments, relates or hyperlinks associated with your features. This way you can save more space for Attributes and Geometry Info sections.
-
Hiding location coordinates
Click location coordinates information can be also hidden in the bottom part of the window if not required.
Note:
-
All options checked in Options menu have an influence on all windows opened: both main tool window and all separate relate windows.
-
Same selection tolerance is applied to the Identify Pro tool as you set it standard way for the Identify and Select tools in the ArcMap selection options. Default selection tolerance value is 3 pixels.